Getting Started
Last updated on 2025-01-14 | Edit this page
Overview
Questions
- Why should I use Julia?
- How do I get started with Julia?
Objectives
- Start a REPL
- Run lines from VS Code
Why Julia
Most of the participants will be coming from Python, Matlab or a lower level language like C/C++ or Fortran. Why should you be interested in learning Julia?
Performance and usability
Julia promises:
- Native performance: close to or sometimes even exceeding C++ or Fortran.
- Solve the multiple language issue: one language for everything (including GPU).
- As easy to get into as Python or R.
- Designed for parallel computing.
These promises seem tantalizing and are in part what draws people to Julia, but in practice getting into Julia and writing performant code are two different things. Julia has its own idiosyncrasies that need to be understood to really squeeze every erg of performance out of your system.
Julia obtains its performance from being a Just-In-Time (JIT) compiler, on top of the lLVM compiler stack (similar to how Python’s Numba operates).
Language intrinsics
Next to being performant, it turns out that Julia is a very nice language that does some things a bit different from what you may be used to:
- First-class arrays and Broadcasting: arrays, slicing and operating on arrays have dedicated syntax, similar to Matlab.
- Multiple dispatch: Julia functions can be specialized on the entire call signature (not just its first argument like in Object Oriented Programming).
- Macros and Meta-programming: The Just-in-time nature of the Julia compiler exposes a wide range of meta-programming capabilities, ranging from small macros to enhance the expressibility of the language to full-on code generation.
Meta-programming, while very powerful, is also very easy to abuse, often leading to unreadable non-idiomatic code. So tread with care! We’ll see some examples where macros are indispensable though, and the SciML stack relies deeply on on-the-fly code-generation.
Why are you interested in Julia? What is your current go-to for efficient computing?
Running Julia
When working in Julia it is very common to do so from the REPL (Read-Eval-Print Loop). Please open the Julia REPL on your system
OUTPUT
$ julia
               _
   _       _ _(_)_     |  Documentation: https://docs.julialang.org
  (_)     | (_) (_)    |
   _ _   _| |_  __ _   |  Type "?" for help, "]?" for Pkg help.
  | | | | | | |/ _` |  |
  | | |_| | | | (_| |  |  Version 1.10.3 (2024-04-30)
 _/ |\__'_|_|_|\__'_|  |  Official https://julialang.org/ release
|__/                   |

julia>
The REPL needs a small introduction since it has several modes.
| Key | Prompt | Mode |
|---|---|---|
| None | julia> |
Standard Julia input. |
] |
pkg> |
Pkg mode. Commands entered here are functions in
the Pkg module. |
; |
shell> |
Shell mode. |
? |
help?> |
Help mode. Type the name of any entity to look up its documentation. |
Play with the REPL (5min)
-
Pkgmode has ahelpcommand to help you along. Find out what theaddcommand does. - Check the contents of the folder in which your are running your REPL
(
lson Unix,diron Windows). - Find out what the
printmethod does in Julia.
-
]help add, theaddcommand installs packages ;ls?print
Pluto
Pluto is the notebook environment from which we will teach much of this workshop. We can run it from the Julia REPL.
OUTPUT
pkg> add Pluto
... quite a bit of output ...

julia> using Pluto

julia> Pluto.run()
[ Info: Loading...
┌ Info:
└ Opening http://localhost:1235/?secret=xyzxyzxyz in your default browser... ~ have fun!
┌ Info:
│ Press Ctrl+C in this terminal to stop Pluto
└
VS Code
VS Code is the editor for which Julia has the best support. We’ll be
needing to run Julia in multiple threads later on, so we’ll set some
arguments for the REPL in settings.json (press
Ctrl-,).
Now when you start a new REPL, (Ctrl-Shift-P, search
“Julia REPL”) you can query the number of threads available:
Julia as a calculator (5min)
Try to play around in Pluto to use Julia as a calculator.
- What do you find is the operator for exponentiation?
- How do you assign a variable?
- What happens when you divide any two integers? Use the
typeoffunction to inspect the type of the result. Can you figure out how to integer division (search the documentation!)? - What happens in Pluto when you change a variable that is depended upon?
- In Julia exponentiation is
^. - Just like you’re used to
x = 3. - The
/operator always returns a floating point value. To get to integer division, we want the÷operator, which can be typed using\divand then press TAB. Or you can use the equivalentdivfunction. - Pluto updates all dependent computations automatically. This is known as a reactive notebook.
- In Julia, the REPL is much more important than in some other languages.
- Pluto is a reactive environment
- VS Code has the best editor integration for Julia
Activate the Workshop Environment
For this workshop, we prepared an environment. Press ]
in the REPL to activate Pkg mode. Make sure that you are in
the path where you prepared your environment (see Setup
Instructions).
(v1.11) pkg> activate .
(EfficientJulia) pkg>
Alternatively, check the little “Julia env” message at the bottom of VS Code, and make sure that the correct environment is there.
You should now be able to generate a plot using GLMakie
(that one dependency that made you wait)
JULIA
using GLMakie
x = -3.0:0.1:3.0
z = sinc.(sqrt.(x.^2 .+ x'.^2))
surface(x, x, z, alpha=0.5)
wireframe!(x, x, z, color=:black, linewidth=0.5)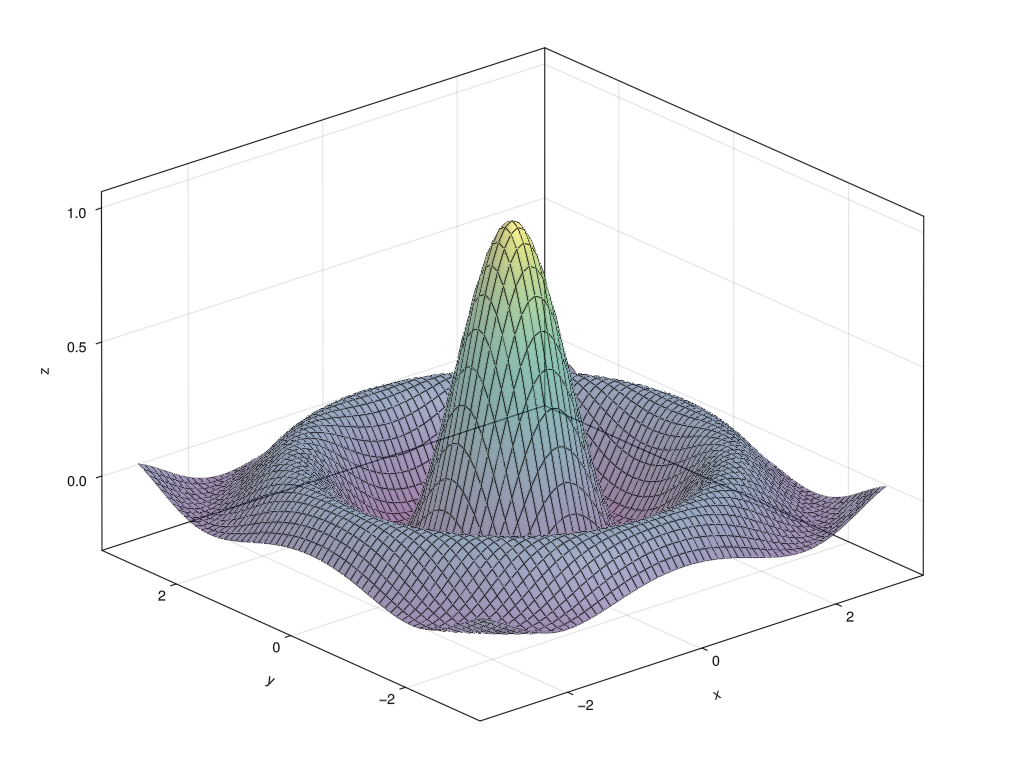
To create the above figure:
JULIA
#| classes: ["task"]
#| creates: episodes/fig/getting-started-makie.png
#| collect: figures

module Script
using GLMakie

function main()
    x = -3.0:0.1:3.0
    z = sinc.(sqrt.(x.^2 .+ x'.^2))

    fig = Figure(size=(1024, 768))
    ax = Axis3(fig[1,1])
    surface!(ax, x, x, z, alpha=0.5)
    wireframe!(ax, x, x, z, color=:black, linewidth=0.5)
    save("episodes/fig/getting-started-makie.png", fig)
end
end

Script.main()