Content from Modular Code Development
Last updated on 2024-09-23 | Edit this page
Overview
Questions
- What are the benefits of writing modular code in terms of maintenance and scalability?
- How can nested code be targeted and improved through modularization?
Objectives
- Understand the key characteristics that make code modular and why it is advantageous.
- Learn strategies for identifying potential modules within complex code to improve readability and reusability.
What is modularity?
Modularity refers to the practice of building software from smaller, self-contained, and independent elements. Each element is designed to handle a specific set of tasks, contributing to the overall functionality of the system.
We will explain modular coding in the slides. You can view the slides here.
Modularity (20 min)
Carefully review the following code snippet:
PYTHON
def convert_temperature(temperature, unit):
    if unit == "F":
        # Convert Fahrenheit to Celsius
        celsius = (temperature - 32) * (5 / 9)
        if celsius < -273.15:
            # Invalid temperature, below absolute zero
            return "Invalid temperature"
        else:
            # Convert Celsius to Kelvin
            kelvin = celsius + 273.15
            if kelvin < 0:
                # Invalid temperature, below absolute zero
                return "Invalid temperature"
            else:
                fahrenheit = (celsius * (9 / 5)) + 32
                if fahrenheit < -459.67:
                    # Invalid temperature, below absolute zero
                    return "Invalid temperature"
                else:
                    return celsius, kelvin
    elif unit == "C":
        # Convert Celsius to Fahrenheit
        fahrenheit = (temperature * (9 / 5)) + 32
        if fahrenheit < -459.67:
            # Invalid temperature, below absolute zero
            return "Invalid temperature"
        else:
            # Convert Celsius to Kelvin
            kelvin = temperature + 273.15
            if kelvin < 0:
                # Invalid temperature, below absolute zero
                return "Invalid temperature"
            else:
                return fahrenheit, kelvin
    elif unit == "K":
        # Convert Kelvin to Celsius
        celsius = temperature - 273.15
        if celsius < -273.15:
            # Invalid temperature, below absolute zero
            return "Invalid temperature"
        else:
            # Convert Celsius to Fahrenheit
            fahrenheit = (celsius * (9 / 5)) + 32
            if fahrenheit < -459.67:
                # Invalid temperature, below absolute zero
                return "Invalid temperature"
            else:
                return celsius, fahrenheit
    else:
        return "Invalid unit"
Refactor the code by extracting functions without altering its functionality.
- What functions did you create?
- What strategies did you use to identify them?
Share your answers in the collaborative document.
PYTHON
def celsius_to_fahrenheit(celsius):
    """
    Converts a temperature from Celsius to Fahrenheit.

    Args:
        celsius (float): The temperature in Celsius.

    Returns:
        float: The temperature in Fahrenheit.
    """
    return (celsius * (9 / 5)) + 32


def fahrenheit_to_celsius(fahrenheit):
    """
    Converts a temperature from Fahrenheit to Celsius.

    Args:
        fahrenheit (float): The temperature in Fahrenheit.

    Returns:
        float: The temperature in Celsius.
    """
    return (fahrenheit - 32) * (5 / 9)


def celsius_to_kelvin(celsius):
    """
    Converts a temperature from Celsius to Kelvin.

    Args:
        celsius (float): The temperature in Celsius.

    Returns:
        float: The temperature in Kelvin.
    """
    return celsius + 273.15


def kelvin_to_celsius(kelvin):
    """
    Converts a temperature from Kelvin to Celsius.

    Args:
        kelvin (float): The temperature in Kelvin.

    Returns:
        float: The temperature in Celsius.
    """
    return kelvin - 273.15


def check_temperature_validity(temperature, unit):
    """
    Checks if a temperature is valid for a given unit.

    Args:
        temperature (float): The temperature to check.
        unit (str): The unit of the temperature. Must be "C", "F", or "K".

    Returns:
        bool: True if the temperature is valid, False otherwise.
    """
    abs_zero = {"C": -273.15, "F": -459.67, "K": 0}
    if temperature < abs_zero[unit]:
        return False
    return True


def check_unit_validity(unit):
    """
    Checks if a unit is valid.

    Args:
        unit (str): The unit to check. Must be "C", "F", or "K".

    Returns:
        bool: True if the unit is valid, False otherwise.
    """
    if not unit in ["C", "F", "K"]:
        return False
    return True


def convert_temperature(temperature, unit):
    """
    Converts a temperature from one unit to another.

    Args:
        temperature (float): The temperature to convert.
        unit (str): The unit of the temperature. Must be "C", "F", or "K".

    Returns:
        tuple: A tuple containing the converted temperature in Celsius and Kelvin units.

    Raises:
        ValueError: If the unit is not "C", "F", or "K".
        ValueError: If the temperature is below absolute zero for the given unit.

    Examples:
        >>> convert_temperature(32, "F")
        (0.0, 273.15)
        >>> convert_temperature(0, "C")
        (32.0, 273.15)
        >>> convert_temperature(273.15, "K")
        (0.0, -459.67)
    """
    if not check_unit_validity(unit):
        raise ValueError("Invalid unit")
    if not check_temperature_validity(temperature, unit):
        raise ValueError("Invalid temperature")
    if unit == "F":
        celsius = fahrenheit_to_celsius(temperature)
        kelvin = celsius_to_kelvin(celsius)
        return celsius, kelvin
    if unit == "C":
        fahrenheit = celsius_to_fahrenheit(temperature)
        kelvin = celsius_to_kelvin(temperature)
        return fahrenheit, kelvin
    if unit == "K":
        celsius = kelvin_to_celsius(temperature)
        fahrenheit = celsius_to_fahrenheit(celsius)
        return celsius, fahrenheit

if __name__ == "__main__":
    print(convert_temperature(0, "C"))
    print(convert_temperature(0, "F"))
    print(convert_temperature(0, "K"))
    print(convert_temperature(-500, "K"))
    print(convert_temperature(-500, "C"))
    print(convert_temperature(-500, "F"))
print(convert_temperature(-500, "B"))PYTHON
class TemperatureConverter:
    """
    A class for converting temperatures between Celsius, Fahrenheit, and Kelvin.
    """

    def __init__(self):
        """
        Initializes the TemperatureConverter object with a dictionary of absolute zero temperatures for each unit.
        """
        self.abs_zero = {"C": -273.15, "F": -459.67, "K": 0}

    def celsius_to_fahrenheit(self, celsius):
        """
        Converts a temperature from Celsius to Fahrenheit.

        Args:
            celsius (float): The temperature in Celsius.

        Returns:
            float: The temperature in Fahrenheit.
        """
        return (celsius * (9 / 5)) + 32

    def fahrenheit_to_celsius(self, fahrenheit):
        """
        Converts a temperature from Fahrenheit to Celsius.

        Args:
            fahrenheit (float): The temperature in Fahrenheit.

        Returns:
            float: The temperature in Celsius.
        """
        return (fahrenheit - 32) * (5 / 9)

    def celsius_to_kelvin(self, celsius):
        """
        Converts a temperature from Celsius to Kelvin.

        Args:
            celsius (float): The temperature in Celsius.

        Returns:
            float: The temperature in Kelvin.
        """
        return celsius + 273.15

    def kelvin_to_celsius(self, kelvin):
        """
        Converts a temperature from Kelvin to Celsius.

        Args:
            kelvin (float): The temperature in Kelvin.

        Returns:
            float: The temperature in Celsius.
        """
        return kelvin - 273.15

    def check_temperature_validity(self, temperature, unit):
        """
        Checks if a given temperature is valid for a given unit.

        Args:
            temperature (float): The temperature to check.
            unit (str): The unit to check the temperature against.

        Returns:
            bool: True if the temperature is valid for the unit, False otherwise.
        """
        if temperature < self.abs_zero[unit]:
            return False
        return True

    def check_unit_validity(self, unit):
        """
        Checks if a given unit is valid.

        Args:
            unit (str): The unit to check.

        Returns:
            bool: True if the unit is valid, False otherwise.
        """
        if unit not in ["C", "F", "K"]:
            return False
        return True

    def convert_temperature(self, temperature, unit):
        """
        Converts a temperature from one unit to another.

        Args:
            temperature (float): The temperature to convert.
            unit (str): The unit of the temperature.

        Returns:
            tuple: A tuple containing the converted temperature in the other two units.
        """
        if not self.check_unit_validity(unit):
            raise ValueError("Invalid unit")
        if not self.check_temperature_validity(temperature, unit):
            raise ValueError("Invalid temperature")
        if unit == "F":
            celsius = self.fahrenheit_to_celsius(temperature)
            kelvin = self.celsius_to_kelvin(celsius)
            return celsius, kelvin
        if unit == "C":
            fahrenheit = self.celsius_to_fahrenheit(temperature)
            kelvin = self.celsius_to_kelvin(temperature)
            return fahrenheit, kelvin
        if unit == "K":
            celsius = self.kelvin_to_celsius(temperature)
            fahrenheit = self.celsius_to_fahrenheit(celsius)
            return celsius, fahrenheit

if __name__ == "__main__":
    converter = TemperatureConverter()
    print(converter.convert_temperature(0, "C"))
    print(converter.convert_temperature(0, "F"))
    print(converter.convert_temperature(0, "K"))
    print(converter.convert_temperature(-500, "K"))
    print(convert_temperature(-500, "C"))
    print(convert_temperature(-500, "F"))
    print(convert_temperature(0, "X"))
Key Points
- Software is built from smaller, self-contained elements, each handling specific tasks.
- Modular code enhances robustness, readability, and ease of maintenance.
- Modules can be reused across projects, promoting efficiency.
- Good modules perform limited, defined tasks and have descriptive names.
- Focus on readability and use tests to guide modularization.
Content from Document your research software
Last updated on 2024-09-23 | Edit this page
Overview
Questions
- What can I do to make my code more easily understandable?
- What information should go into comments?
- What are docstrings and what information should go into docstrings?
Objectives
- Know what makes a good documentation
- Learn what tools can be used for writing documentation
- Be able to motivate a balanced decision: sometimes READMEs are absolutely enough
Why we teach this lesson
Specific motivations:
- Code documentation becomes quickly unmanageable if not part of the source code.
- It helps people to quickly use your code thus reducing the time spent to explain over and again to new users.
- It helps people to collaborate.
- It improves the design of your code.
What makes a good documentation?
Exercise: Think of good and bad examples
Write down your thoughts in the collaborative documents. Respond with emojis 👍 🙀 to your colleagues’ answers. - Think of projects of which you like the documentation. What do you like about them? - Think of projects for which you don’t like the documentation. What don’t you like about them? Are you missing anything?
NB: You can choose a mature library with lots of users for this exercise, but try to also think of less mature projects you had to collaborate on, or papers you had to reproduce.
- It is important to document code
- Think about the people reading your documentation (your audience)
- Depending on the purpose and state of the project documentation needs to meet different criteria.
- For most scientific projects, in-code documentation and a well thought out README file is enough.
- Documentation should be tracked with corresponding code
Types of documentation
There are different types of documentation:
- README files
- in-code documentation
- API documentation
- Tutorials
We will discuss a few of them in more depth.
Writing good README files
The README file is the first thing a user/collaborator sees. It should include:
- A descriptive project title
- Motivation (why the project exists)
- How to setup
- Copy-pastable quick start code example
- Link or instructions for contributing
- Recommended citation
Exercise README: Draft or improve a README for one of your recent projects (in breakout rooms)
Try to draft a brief README or review a README which you have written for one of your projects.
You can work individually, but you could also discuss whether anything can be improved on your neighbour’s README file(s).
Think about the user (which can be a future you) of your project, what does this user need to know to use or contribute to the project? And how do you make your project attractive to use or contribute to?
(Optional): Try the https://hemingwayapp.com/ to analyse your README file and make your writing bold and clear.
In-code documentation
In-code documentation: - Makes code more understandable - Explains decisions we made
When not to use in-code documentation:
- When the code is self-explanatory
- To replace good variable/function names
- To replace version control
- To keep old (zombie) code around
Readable code vs commented code
vs
Writing good comments - In-code-1: Comments
Let’s take a look at two example comments (comments in Python start
with #):
Comment A
PYTHON
  # now we check if temperature is below -50
  if temperature < -50:
      print("ERROR: temperature is too low")
Comment B
PYTHON
  # we regard temperatures below -50 degrees as measurement errors
  if temperature < -50:
      print("ERROR: temperature is too low")
Which of these comments is more useful? Can you explain why?
- Comment A describes what happens in this piece of code. This can be useful for somebody who has never seen Python or a program, but for somebody who has, it can feel like a redundant commentary.
- Comment B is probably more useful as it describes why this piece of code is there, i.e. its purpose.
What are “docstrings” and how can they be useful?
Here is function fahrenheit_to_celsius which converts
temperature in Fahrenheit to Celsius.
The first set of examples uses regular comments:
PYTHON
# This function converts a temperature in Fahrenheit to Celsius.
def fahrenheit_to_celsius(temp_f: float) -> float:
    temp_c = (temp_f - 32.0) * (5.0/9.0)
    return temp_c
The second set uses docstrings or similar concepts. Please compare the two (above and below):
PY
def fahrenheit_to_celsius(temp_f: float) -> float:
    """
    Converts a temperature in Fahrenheit to Celsius.

    Parameters
    ----------
    temp_f : float
        The temperature in Fahrenheit.

    Returns
    -------
    float
        The temperature in Celsius.
    """

    temp_c = (temp_f - 32.0) * (5.0/9.0)
    return temp_c
Docstrings can do a bit more than just comments: - Tools can generate help text automatically from the docstrings. - Tools can generate documentation pages automatically from code.
It is common to write docstrings for functions, classes, and modules.
Good docstrings describe: - What the function does - What goes in (including the type of the input variables) - What goes out (including the return type)
Naming is documentation: Giving explicit, descriptive names to your code segments (functions, classes, variables) already provides very useful and important documentation. In practice you will find that for simple functions it is unnecessary to add a docstring when the function name and variable names already give enough information.
User/API documentation
- What if a README file is not enough?
- How do I easily create user documentation?
Tools
You can use the following tools to generate user or API documentation:
Sphinx (documentation generator)
- creates nicely-formatted HTML pages out of .md or .rst files
- programming language independent
Github pages (deploy your documentation)
- set up inside your GitHub repository
- automatically deploys your Sphinx-generated documentation
Key Points
- Depending on the purpose and state of the project documentation needs to meet different criteria.
- Good README files provide a good landing place for anyone that is new to your project
- Comments should describe the why for your code not the what.
- Writing docstrings can be a good way to write documentation while you type code since it also makes it possible to query that information from outside the code or to auto-generate documentation pages.
Content from Testing
Last updated on 2024-10-21 | Edit this page
Overview
Questions
- Why should I write automated tests for my code?
- How do I write a good unit test?
Objectives
- Use
pytestto write and run unit tests - Understand that testing has many forms.
Basics of testing
Follow these slides to understand the basics of testing.
The first step toward getting the right answers from our programs is to assume that mistakes will happen and to guard against them. This is called defensive programming and the most common way to do it is to add alarms and tests into our code so that it checks itself.
Testing should be a seamless part of scientific software development process. This is analogous to experiment design in the experimental science world:
- At the beginning of a new project, tests can be used to help guide the overall architecture of the project.
- The act of writing tests can help clarify how the software should be perform when you are done.
- In fact, starting to write the tests before you even write the software might be advisable. Such a practice is called test-driven development.
Tests types
There are many ways to test software, such as:
- Assertions
- Exceptions
- Unit Tests
- Integration Tests
Exceptions and Assertions: While writing code,
exceptions and assertions can be added to
sound an alarm as runtime problems come up. These kinds of tests, are
embedded in the software itself and handle, as their name implies,
exceptional cases rather than the norm.
Unit Tests: Unit tests investigate the behavior of units of code (such as functions, classes, or data structures), ideally the smallest possible units. By validating each software unit across the valid range of its input and output parameters, tracking down unexpected behavior that may appear when the units are combined is made vastly simpler.
Integration Tests: Integration tests check that various pieces of the software work together as expected. They can be both on small scales, or system wide.
How much testing is enough?
Possible tests metrics are:
- Lines of code.
- Test coverage example: to check to which extent the software is being coverted by the tests.
PyTest
Currently, PyTest is the recommended Python testing framework. Let’s see how it can be used to run the tests.
First, create a directory and navigate into it:
Then, create a file example.py containing an example
test. You can use for favourite text editor for creating the file:
And then, in the file, type:
PYTHON
def add(a, b):
   return a + b


def test_add():  # Special name!
    assert add(2, 3) == 5  # What's `assert`? 🤔
    assert add('space', 'ship') == 'spaceship'
What’s assert?
Assertions are the simplest type of test. They are used as a tool for bounding acceptable behavior during runtime. The assert keyword in python has the following behavior:
OUTPUT
Traceback (most recent call last):
  File "<stdin>", line 1, in <module>
AssertionError
That is, assertions raise an AssertionError if the
comparison is false. It does nothing at all if the comparison is true.
Assertions are therefore a simple way of writing tests.
Activate your conda environment:
Check the version of pytest:
Finally, run the test:
OUTPUT
pytest example.py
======================== test session starts ========================
platform linux -- Python 3.6.9, pytest-7.0.1, pluggy-1.0.0
rootdir: /home/ole/Desktop/pytest-texample
collected 1 item

example.py .                                                  [100%]

========================= 1 passed in 0.00s =========================
When pytest is run, it will search all directories below
where it was called, find all of the Python files in these directories
whose names start or end with test, import them, and run
all of the functions and classes whose names start with
test or Test. This automatic registration of
test code saves tons of human time and allows us to focus on what is
important: writing more tests.
When you run pytest, it will print a dot
(.) on the screen for every test that passes, an
F for every test that fails or where there was an
unexpected error. The tests pass when they do not throw errors. In rarer
situations you may also see an s indicating a skipped tests
(because the test is not applicable on your system) or a x
for a known failure (because the developers fixed the problem shown in
the test). After the dots, pytest will print summary information.
Tests collection
If you do pytest dir, the pytest package
‘sniffs-out’ the tests in the directory and ran them together to produce
a report of the sum of the files and functions matching the regular
expression [Tt]est[-_]*.
What happens if we break the test on purpose?
PYTHON
def add(a, b):
    return a - b  # Uh oh, mistake! 😱


def test_add():
    assert add(2, 3) == 5
    assert add('space', 'ship') == 'spaceship'
Let’s save the edits and run pytest again:
OUTPUT
======================== test session starts =========================
platform linux -- Python 3.6.9, pytest-7.0.1, pluggy-1.0.0
rootdir: /home/ole/Desktop/pytest-texample
collected 1 item

example.py F                                                   [100%]

============================== FAILURES ==============================
______________________________ test_add ______________________________

    def test_add():
>       assert add(2, 3) == 5
E       assert -1 == 5
E        +  where -1 = add(2, 3)

example.py:6: AssertionError
You can notice that functions fail on the first error, but all test functions are executed.
Pure vs impure functions
Pure functions are deterministic, have a return value, have no side effects[1], and have referential transparency[2]. Thus, pure functions are easy to understand and test.
[1] Side effects: interactions of a function with its surroundings. [2] Replacing a function call with the return of that function should not change anything.
Examples of pure functions:
On the other hand, impure functions can be both intuitive:
PYTHON
my_list = []

def append_to_my_list(item):
    my_list.append(item)


def read_data(file_name):
    return pd.read_csv(file_name)


def get_random_number(number):
    return random.random()
And not so intuitive:
PYTHON
def hello(name):
    print("Hello", name)


nums = [1, 2]

def append(a_list, item):
    a_list += [item]
    return a_list

print(nums)            # [1, 2]
print(append(nums, 3)) # [1, 2, 3]
print(nums)            # [1, 2, 3] 😬
Some side effects can be indeed necessary or hard to spot.
Use pure functions when possible 👌
Test-Driven Development: FizzBuzz Function (15 min)
The function fizz_buzz() takes an integer argument and
returns it, BUT:
- Fails on zero or negative numbers.
- Instead returns “Fizz” on multiples of 3.
- Instead returns “Buzz” on multiples of 5.
- Instead returns “FizzBuzz” on multiples of 3 and 5.
Create an empty function fizz_buzz() and go through the
conditions listed above, one by one:
- Write a test for the condition.
- Edit the
fizz_buzz()function until the test passes.
Then discuss together the different solutions.
Here is a potential solution:
PYTHON
import pytest

def fizz_buzz(input):
    if input <= 0:
        raise ValueError('Negative or zero input not allowed')
    if input % 3 == 0 and input % 5 == 0:
        return 'FizzBuzz'
    if input % 3 == 0:
        return 'Fizz'
    if input % 5 == 0:
        return 'Buzz'
    return input

def test_fizz_buzz():
    with pytest.raises(ValueError):
        fizz_buzz(0)
    with pytest.raises(ValueError):
        fizz_buzz(-2)
    assert fizz_buzz(1) == 1
    assert fizz_buzz(3) == 'Fizz'
    assert fizz_buzz(4) == 4
    assert fizz_buzz(5) == 'Buzz'
    assert fizz_buzz(6) == 'Fizz'
    assert fizz_buzz(10) == 'Buzz'
    assert fizz_buzz(15) == 'FizzBuzz'
Key Points
- Tests are meant for preserving functionality by detecting new errors early and facilitating reproducibility for research software.
- Tests can help users in verifying correct installation and improving correctness for research output.
- Tests enable developers to make refactoring easier and simplify external contributions.
- Test-Driven Development (TDD) is an optional tool in your toolbox.
Content from Continuous Integration
Last updated on 2024-09-23 | Edit this page
Overview
Questions
- How can we implement automatic testing each time we push changes to the repository?
Objectives
- Set up Continuous Integration using GitHub Actions
Introducing Continuous integration
Follow these slides to understand the basics of continuous integration.
Full-cycle collaborative workflow
Exercise: Full-cycle collaborative workflow
The exercise takes 30-40 minutes.
In this exercise, everybody will:
- A. Set up automated tests with GitHub Actions
- B. Make test fail / find a bug in their repository
- C. Open an issue in their repository
- D. Then each one will clone the repo of one of their exercise partners, fix the bug, and open a pull request (GitHub)
- E. Everybody then merges their co-worker’s change
Step 1: Create a new repository on GitHub
- Select a different repository name than your colleagues (otherwise forking the same name will be strange)
- Before you create the repository, select “Initialize this repository with a README” (otherwise you try to clone an empty repo).
- Share the repository URL with your exercise group via shared document or chat
Step 2: Clone your own repository, add code, commit, and push
Clone the repository.
Add a file example.py containing:
PYTHON
def add(a, b):
    return a + b

def subtract(a, b):
    return a + b  # do not change this line until prompted to do so.
Write a test function def test_add() for
add to check that this function is working properly. Do NOT
add a test function for subtract (yet). Run pytest to
ensure it works
Then stage the file (git add <filename>), commit
(git commit -m "some commit message"), and push the changes
(git push).
Step 3: Enable automated testing
In this step we will enable GitHub Actions. - Select “Actions” from your GitHub repository page. You get to a page “Get started with GitHub Actions”. - Select the button for “Set up this workflow” under Python Application.
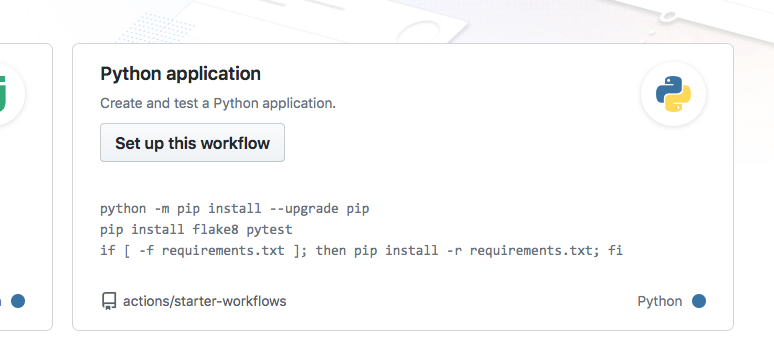 Select “Python
application” as the starter workflow.
Select “Python
application” as the starter workflow.
GitHub creates the following file for you in the subfolder
.github/workflows:
YAML
# This workflow will install Python dependencies, run tests and lint with a single version of Python
# For more information see: https://help.github.com/actions/language-and-framework-guides/using-python-with-github-actions

name: Python application

on:
  push:
    branches: [ main ]
  pull_request:
    branches: [ main ]

jobs:
  build:

    runs-on: ubuntu-latest

    steps:
    - uses: actions/checkout@v2
    - name: Set up Python 3.9
      uses: actions/setup-python@v2
      with:
        python-version: 3.9
    - name: Install dependencies
      run: |
        python -m pip install --upgrade pip
        pip install flake8 pytest
        if [ -f requirements.txt ]; then pip install -r requirements.txt; fi
    - name: Lint with flake8
      run: |
        # stop the build if there are Python syntax errors or undefined names
        flake8 . --count --select=E9,F63,F7,F82 --show-source --statistics
        # exit-zero treats all errors as warnings. The GitHub editor is 127 chars wide
        flake8 . --count --exit-zero --max-complexity=10 --max-line-length=127 --statistics
    - name: Test with pytest
      run: |
        pytest
Commit the change by pressing the “Start Commit” button.
Step 4: Verify that tests have been automatically run
Observe in the repository how the test succeeds. While the test is executing, the repository has a yellow marker. This is replaced with a green check mark, once the test succeeds.
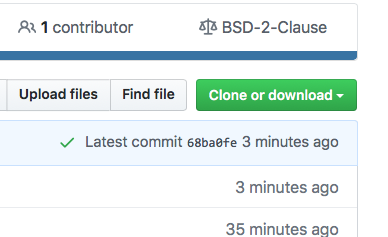
Green check means passed.
Also browse the “Actions” tab and look at the steps there and their output.
Step 5: Add a test which reveals a problem
After you committed the workflow file, your GitHub repository will be ahead of your local cloned repository. Update your local cloned repository:
$ git pull origin mainNext uncomment add a test function test_subtract for to
check that the subtract function can subtract two numbers
from each other, and push it to your remote repository. Verify that the
test suite now fails on the “Actions” tab (GitHub).
Step 6: Open an issue on GitHub
Open a new issue in your repository about the broken test (click the “Issues” button on GitHub and write a title for the issue). The plan is that your colleague will fix the issue through a pull request
Step 7: Fork and clone the repository of your colleague
Fork the repository using the GitHub web interface. Make sure you clone the fork after you have forked it. Do not clone your colleague’s repository directly.
Step 8: Fix the broken test
Fix the function now and run pytest to check that it works. Then push to your fork. Check whether the action now also passes.
Step 9: Open a pull request (GitHub)
Then before accepting the pull request from your colleague, observe how GitHub Actions automatically tested the code.
If you forgot to reference the issue number in the commit message,
you can still add it to the pull request:
my pull request title, closes #NUMBEROFTHEISSUE
Key Points
- Use GitHub Actions to automate checking your code each time you push changes to the repository.